post

Initialize a Database Using SQL Scripts with Spring Boot

1. Story

  • There are many cases in which we need to initialize an SQL database at application startup.
  • Either creating schema based on DDL scripts or feeding initializing data into database by DML scripts may be required in application startup.
  • Spring Boot provides simple features for developers to run both DDL and DML scripts automatically.
  • In this post we use this feature practically.
 

2. Create Project

You can find the complete project at Github.

Create a new project by using online Spring initializer either at start.spring.io or on Intellij _Idea > New Project > Spring Initializr.

And in dependencies window select 3 dependencies that we named them in "dependencies section" of this post.

3. Dependencies

The only needed dependency that do the job for running SQL scripts automatically is spring-boot-starter-data-jdbc. But we also want to use h2database as a simple embeded database. And at last we use spring-boot-starter-web to make our project a simple running project, so our dependencies in pom.xml file looks like this:

4. Configure H2 Database

Because of its simplicity we choose embedded h2 as our SQL databse. So no need to have a SQL database like MySQL or Oracle to be installed on your environment.

H2 is a lightweight SQL database written by Java which can also be embedded in a Java application(in memory).

And now as you can guess is the time for telling Spring_data_jdbc how to connect to our database instance of h2. We tell these things as some configuration statements. So let's open "application.properties" file in "resources" folder and fill it like this one:


Please note that we want to have a GUI from h2 so we added "spring.h2.console.enabled=true" in the properties file. And by this setting by running the application, we also will have an h2 console on our web-browser which we talk about it in following sections of this post.

Other properties are about addressing our desired h2 database. These settings seems to be much clear and self descriptive.

5. DDL Scripts

In SQL, DDL stands for Data Definition Language. DDL statements create, modify, and remove database objects such as tables and indexes.

We add a file named schema.sql to the resource folder to be loaded to classpath. This file should contains all the DDL scripts for our desired database schema.


6. DML Scripts

In SQL, DML stands for Data Manipulation Language. DML statementa used for adding (inserting), deleting, and modifying (updating) data in a database.

In this step we create a file named "data.sql" in "resource" folder to be added into the classpath and fill it with our desired DML statements:


There are two insert command in our data.sql file and of course you can add any other commands for INSERT, UPDATE, and DELETE data.

7. See Results in Console

Hey congrats, that's all, now you can run your application and if there is no bugs you would get a message like "Started DatabaseInitializationApplication in 1.828 seconds (JVM running for 2.548)" in your console/terminal.

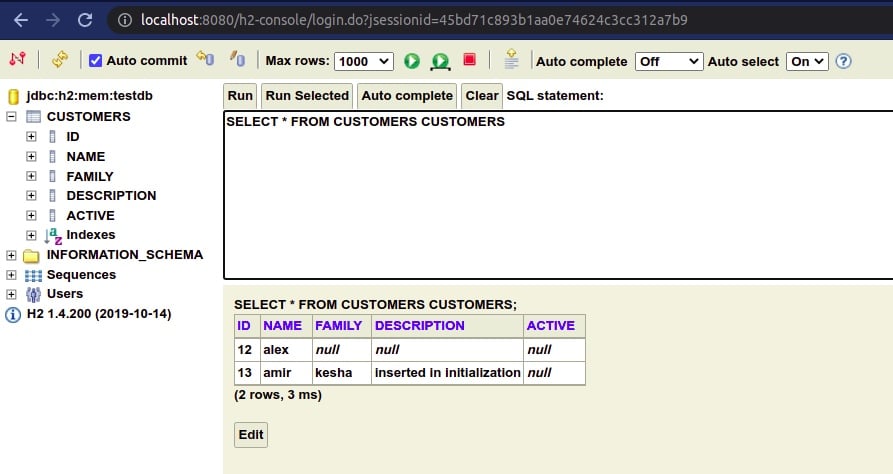
So good. Let's open a browse and go to http://localhost:8080/h2-console. Login with the credentials that you declared in application.properties file.

And at last you can find your automatically generated table(s) with its inserted data in the h2 console just like below image.


8. Multi Datasources

If you need more than one datasource in your application, then you must determine one of them as the primary one, so Spring-data-jdbc can do things on this primary datasource.

If you do not determine the primary datasource then while starting the application h2console and also Spring-data-jdbc could not find a primary datasource and return error message. So we add second datasource properties in the application.properties file and also we define two beans for primary and second datasource and determine one of them with @Primary.


9. Further Reading

Spring Boot can also supports Higher-level Migration Tools, like Flyway or Liquibase for doing database migrations at startup. This topic is out of the context of this post and you can read more about that in Spring Documents.


Thanks for Reading. Good lock.

post

Build small docker images for Java (jlink)

1. Story

  • As a Java developer I package my project into a runnable immage, for example package it into Docker images as explained here and here. So I have runtime images in which there is a JRE(Java Runtime Environment) to execute my code. But is it performant enaugh to have entire JRE there?
  • Is it possible to select only parts of JRE that my program needs them?
  • Smaller JRE means smaller image size and also prevents wasting memory. Wow..
  • So in this post we will see how to reduce JRE size to and fits it on our project/module/code.

Please note that this all commands in this post are executable on linux and if you are using Windows or IOS, then little fitnesses is needed.

2. Solution idea by using jlink

Before Java 9, JRE was a monolithic software system. But in Java 9 a new feature comes in as a game changer with huge benefits. Java modules is the feature provided by Java Platform Module System(JPMS) in Java 9.

The general idea with Java modules is that it makes it possible to remove parts of a program which your application not be using.

With this new feature, JRE as a software system also restructured into a modular system, and now we want to recruit only JRE modules wich our application needs them.

In the other side, as the main player of our goal in this post, jlink is a tool that comes with JDK and makes it possible to assemble a set of Java modules and their dependencies into a custom and optimised runtime image.

jlink can be called via command like this:

In comming steps we use jlink in the process of packaging our application.

3. Sample java project

You can recruit any Java project that you prefer to carry out with this tutorial, but a recommendation would be using this Github repository as a very simple hello world Spring-Boot project.

4. What was the state before using jlink

At first we build a Docker image straight forward and without using jlink to see its size and in next step we will show how it will be reduced by using jlink. So in this step we built a Docker image as it explained here as "Simple Java + Docker". And we can see that its size is 238MB.

But let's see how we can make it even smaller than 238MB by using jlink.

5. Using jlink for our application

At first check your Java version by "java -version" and if it is above 9 then it would be OK for this step.

Jlink tool operates on jar files and our application is a jar file. But if your application is a war file you can copy it into a jar file by a simple command as below:

This is the main command we call for compose our custom JRE by using jlink:

In above command there is a call for jdeps which is a tool in JDK which can list dependencies of our jar file.

So in jlink command we use --add-modules to add Java modules which our jar file depends on them and also we add some other Java modules that we know Spring needs them.

6. Spring dependencies for custom JRE

I couldn't find a straight forward way for knowing Spring depends on which Java modules. But with some knowledge and also some try and errors this is the list that I found at last: jdk.unsupported,java.xml,java.sql,java.naming,java.desktop,java.management,java.security.jgss,java.instrument

7. Build docker image

Now we have both our application jar file and our custom JRE in a directory named myjre. So let's:

  1. create a Dockerfile for building final Docker image.
  2. Put this file in the root of your project

  3. as the final step we build the Docker image and show its size:
  4. Now we can call "docker image ls | grep amir/hello" and see that the image file is 180MB and much less than 238MB. Also we can think about the performance as we already have a JRE without unwanted modules in running memory when we run it.
  5. For final testing we can run the container by calling "docker run -p 8080:8080 amir/hello" and then go to browser and bring up "http://localhost:8080", then you could see a "Hello" in response.

8. Multi-Stage Docker image

As you see everything is done and we built our optimised Docker image for our Java application. But how we can simplify these steps by using multi-stage Docker file. For this purpose we can easily have a Dockerfile in our project root which would be able to:

  1. build the project
  2. and then build needed custom JRE
  3. and at last wrap them all up into a Docker image

You can see such a Dockerfile below, Also it's available as a whole project in Github.

post

Build a Docker Image Using Maven or Gradle

1. Story

  • That is a common way to package our applications as a Docker image by using Dockerfile as explained here. But as a Java developer we use Maven or Gradle for building and packaging our applications. And so we want to make building of Docker image fits into our workflow.
  • Another story is that as a Java developer I do not prefer to build Docker images without a Docker daemon.
  • And also another story is that I have no deep mastery of Docker best-practices to build docker images and so that would be cool if a tool can keep care of building optimized Docker images for us.

2. Solution by using Jib

Jib is an open source tool that supports above need and builds optimized Docker and OCI images for your Java application without a docker Daemon. It is available as a Maven and Gradle and as a Java library. In common we can say that Jib is a compiler for containers.

In addition to the above advantages Jib also provides these facilities:

  • Jib separates your application into multiple layers, but how? : by separating dependencies from classes and not needing to rebuild entire Docker image. So Jib speed up your build process very effectively by rebuilding only the layers that changed.
  • Jib can also automate the process of pushing Docker images into your desired registry.
  • Not need to care about Docker best practices and following them across the team.
  • A docker daemon is not needed by using Jib, but optionally you can configure it to use a Docker daemon.

3. Sample java project

You can recruit any Java-Maven project that you prefer to carry out with this tutorial, but a recommendation would be using this Github repository as a very simple hello world Spring-Boot project.

4. pom.xml

The only thing that we must do is adding and configuring Jib Maven plugin In pom.xml file in our project. So at the begining below listing would be a proper point to make your hand wet:

Above listing is self-descriptive as well, and you can focus on its content for learning the concept but please take into these conciderations:

  • Replace your Docker hub credentials at line 4, 5, 6
  • <from> tag determines the base image which our final Docker image would be built from it
  • <to> tag is mandatory and determines name of our targeted Docker image
  • in <execution> part determined that running "mvn package" command will run also "mvn jib:build" goal. And so we now do have building our desired Docker image in our packaging workflow as an automatic operation.

5. jib:build vs jib:dockerBuild

As mentioned above we used jib:build in our pom.xml. But we should know that there is another goal named jib:dockerBuild which uses the Docker daemon in the hosting machine instead of ignoring it. This is important because in some situations we need this option. For example in next sections of this article you would see that we want have our built Docker image on our Docker daemon to see its history.

So we can also use dockerBuild goal instead of build goal in line 43 of above pom.xml.

6. Build Docker image

Now everything is done and running each of below commands would cause Docker image to be built and even pushed into Docker hub:

7. Docker image history

If we use jib:dockerBuild then we can see the Docker image in our daemon. Listing below shows running this purpose:


Now lets see what happend about Docker image layers as an optimization in building Docker image. For this pupose we ran below command:

That's great that we can see there are three images CREATED BY jib-maven-plugin and those COMMENTs shows us that there are three different layes for classes, resources, and dependencies. Now suppose that you change a line of your source code and rebuild your project, in this situation you would see that the build process will run very speedy, because the only layer that would be changed is the classes layer. So it will be the same if you only change in your resources or dependencies. And this is a great optimization without needing our team to be aware about docker image layers.


8. Next

In next article we will learn how to build smaller Docker images for our Java projects.

post

Inject maven dependencies into Docker image

1. Story

  • As a Java developer I want to build a Docker image
  • I want to aquire a Docker feature named multi-stage builds
  • While that process I want to prevent downloading mvn dependecies through building docker image process
  • So I want to manually inject dependencies into Docker image

2. Build Docker image

    1. Sample project:
As a simple sample project we have a Spring-Boot hello world project which responses on http://localhost:8080 You can provide your desired project or clone/download the github repository from here: https://github.com/AmirKeshavarz/hello-docker-java
    1. Create local Maven repo:
In terminal go to the project directory and run below command to download all maven dependencies and put them in a compressed file: * dependecy:go-offline cause all dependencies being downloaded * -Dmaven.repo.local=./repo makes a directory named repo and download all dependencies into it
    1. Create Dockerfile:
In project directory create a file named Dockerfile-injectrepo(Or it exists if you clone from our github) Note that in line 3 ADD command is injecting our pre downloaded maven repo into first stage of our Docker image.
    1. Build docker image:
For this step Docker must be installed on your system In terminal go to root of the project and run below command for building docker image: * Please notice that there is a dot(.) at the end of above command. In terminal run below command for having a test and run the container:
  1. Go to browser and browse into http:\localhost:8080
Below, a couple of points are mentioned which are not described here to keep this article simple.
  • Use -v option of docker for mounting your local maven repository and prevent downloading maven dependencies in build repetitive phase.
  • Use Maven plugins for building images instead of direct docker CLI commands.
  • Push docker image into a docker hub to make it accessible from hosts outer of your local.
post

Simple Java + Docker

1. Introduction

As a Java developer I want to build a lean Docker image for my java app. A Docker feature named "multi-stage builds" make this process so easy and straight forward.

2. Sample Project

As a simple sample project we have a Spring-Boot hello world project which responses on http://localhost:8080 You can provide your desired project or clone/download the github repository from here:
https://github.com/AmirKeshavarz/hello-docker-java

3. Dockerfile

In the root of the project there would be a file named Dockerfile containing below listing:

4. How to run

  1. Docker must be installed on your system
  2. In terminal go to root of the project and run below command for building docker image:
  3. * Please notice that there is a dot(.) at the end of above command.
  4. In terminal run below commands for running the container:
  5. Check your application in browser: Go to browser and browse into http:\\localhost:8080
  6. Check your docker container: Go to terminal and run below command:

5. Next

Below, a couple of points are mentioned which are not described here to keep this article simple.

  • Use -v option of docker for mounting your local maven repository and prevent downloading maven dependencies in build repetitive phase.
  • Use Maven plugins for building images instead of direct docker CLI commands.
  • Push docker image into a docker hub to make it accessible from hosts outer of your local.
post

Set custom Process name for service in Linux CentOS

I have had created some systemd services in Linux(CentOS) which described at create-linux-systemd-service. Now for a monitoring requirement that's needed to set a custom process name to my running services.

Some different solutions were tested and none of them worked on CentOS-7x.

Finally founded that there is a very simple solution which I am going to share it here. As described at previous post about systemd we created a service file which has a ExecStart part in which I had directly run a Java process, for example it was something like this:

In this way CentOS is not going to assign a process name to the running process. You can test this by trying one of below commands:

ps aux | grep myservice
pgrep myservice

Believe it or not the only thing that is needed to assign a name to our process is moving the command in front of ExexStart into an sh file and tell ExecStart to run that file, in this way CentOS will assign the name of sh file into the process. Here are steps:

run command: sudo systemctl daemon-reload

run command: chmod 711 /home/keshavarzreza/bin/myapp-start.sh run command: sudo systemctl restart myservice.service

Now you can try one of below commands again and this time you would see your process(es) PID(s) in response:

ps aux | grep myservice
pgrep myservice

post

CI/CD with Jenkins

Recently I had a nice experience with Jenkins in which I worked with many different facilities CI/CD and concepts via Jenkins. In this article I want to share this experience as short as not being boring.

Jenkins is The leading open source automation server, Jenkins provides hundreds of plugins to support building, deploying and automating any project. (cited from jenkins.io)

1. CI/CD (Continuous Integration/Delivery/Deployment)

Jenkins is a tool for continuous integration and continuous deployment (CI/CD) which is widely used in many projects because of its simplicity and independence. I don't want to make this part long so below picture shows you the meaning of three expressions of CI/CD and their differences in a big-picture.


2. Install Jenkins

Based on our conditions we decided to install Jenkins as a Docker container. Docker provides the ability to package and run an application in a loosely isolated environment called a container. The isolation and security allow you to run many containers simultaneously on a given host.

Jenkins describes how to install it as a docker container in the formal website but there is a point to make it much better by a small change about not using docker-in-docker(dind). So I write all steps on macOS and Linux here without more description and at the end describe just about the point.


As you can see we have "-v /var/run/docker.sock:/var/run/docker.sock" which makes "dind" needless. Dind is a docker engine running as a container on host's docker engine. And instead of dind we used host's docker engine itself by socket solution. At the moment In Jenkins formal website there is one more step before running Jenkins container which is running docker-in-docker container and use it in Jenkins container with adding this "--env DOCKER_HOST=tcp://docker:2376". But we don't need it any more.

The main idea which caused me thinking about removing dind is that it will be unstable in some situations in which it would be probable to loose our dind image and all Jenkins needed utilities installed on that dind. So I googled and found some hints and between them also found an article written by one of dind contributors, "Using Docker-in-Docker for your CI or testing environment? Think twice"

Our project code is written by Java and for some reasons I also mount JDK and Gradle from our host into the Jenkins container. Also some unnecessary parts removed. So at last I had run below command instead of last one:

Now we can browse http://localhost:8080 or http://your-host-ip:8080 to access Jenkins UI, and follow its instruction for defining admin user/pass.

3. Install JDK on Jenkins

I know that JDK is not the only kit you need but here I tell about my experience just about JDK and Gradle and you can map this into other needs like nodeJS, Maven, etc.

Jenkins lets install multi JDKs (for example you need different versions). As described in above section, we extract JDK on host and mount its root into our Jenkins docker container. Also it would be possible to install JDK on Jenkins image/container itself which I don't want to do that here. Now that we already have JDK mounted in our container:

  1. login in Jenkins panel
  2. go to "Manage Jenkins"
  3. "Global Tool Configuration"
  4. click on "JDK Installations..."
  5. Type a name in "name" text-box
  6. Type JDK path based on mounted path in prev section in "JAVA_HOME" text-box (/opt/jdk/jdk1.8.0_241 in our case)
  7. click on "save"

As mentioned we did such work for Gradle and you can do it for other toolkits.

4. Create Simplest Project in Jenkins

On Jenkins UI click on "New Item" then type a name for this project and select "Freestyle Project", and then click on "OK", Now you have a very simple project for first try.

In configure project go to "Build" section and click on "Add Build Step">"Execute shell". This is a very simple try for moving our hands on the main work. Write some shell scripts there for example: echo $JAVA_HOME , java -version . Click on "Save" and at last click on "Build now". At last you can select your build number and click on "Console Output" to see what Jenkins cooked for you and how things matched together.

5. Jenkins Pipeline

Now that's time to move one step toward more advanced features and I think working with "Pipeline" would be a very main step. Repeat previous part steps to add a project but this time select "Pupeline" instead of "Freestyle". Pipeline script is a groovy-based syntax which Jenkins provides it and you can code it while configuring your project.

6. Pipeline as Code

I know that two steps are missed lets say "Installing plugins" and "Connect project to Git". And I would add them here or on another article soon. But for completing the puzzle I'm eager to write here that we made a file in our Java source code (in git) named "Jenkinsfile" and code our desired Pipeline steps there. After that we told our Pipeline Project in Jenkins to follow that file as a Pipeline-code. Sorry for lack of my time and notes here, all these steps would be added or linked here soon.

post

create a Linux systemd service and make it runable for non-root users

We can easily delegate management of running a process/script into Linux by systemd. systemd is a Linux system tool that one of its features is bootstrapping start and manage system processes. For better understanding we are going to create a custom systemd service to make it easy to start, stop, restart our script as well as configure it to start at boot. And we make non-root users able to use these facilities.

1. Create a systemd service

Suppose that we have a script in /usr/bin/myscript.sh Also suppose that there is a Linux user named myuser in group ourgroup Now this is the main part of the story in which we make a file in /etc/systemd/system/myservice.service including below directives: I'm not going to make this tutorial a long story by describing about parts of .service file. So let's find out how we can make sense about its usability. Run this command to make your myscipt.service loaded into systemd: Now as a sudoer user you are able to manage myscipt.service using systemctl commands: But how we make it possible for not-root users to use these facilities?!

2. Use PolicyKit to allow non-root users to mange the service

PolicyKit is an application-level toolkit for defining and handling the policy. As a practical step here we create a new file in /etc/polkit-1/rules.d/99-ourgroup.rules including:

3. Define needed sudoer access using visudo

Linux and Unix administrators use sudoers file to allocate system rights to system users. This allows the administrator to control who does what. Visudo command is a secure and safe way of editing the /etc/sudoers file on Linux. So just run $sudo visudo command and add below lines into sudoers file:
post

Jdbc Template vs others

Recently we used JdbcTemplate in one of our projects. I tend to use Hibernate which is an ORM, whenever we need to work with databases. But lets have a short comparison between different options a java developer has for working with databases.

1. Java Database Connectivity (JDBC)

At first we can focus on the most basic alternative which is Java Database Connectivity (JDBC). JDBC is a standard java API for accessing data between the Java Standard Edition and a wide range of databases. In short we can say JDBC API tasks are:
  • make and handle connections to database
  • creating SQL statements
  • executing SQL statements in target database
  • viewing and modifying resulting records
In most cases JDBC programming is a pain for developers as they need to manage primary things such as connections with repeating some basic codes.

2. Hibernate (ORM)

Hibernate object relational mapping provides a framework for mapping an object-oriented domain model to a relational database. So developer can focus only on the domain model and deliver all database related concerns into Hibernate. For example you can define a POJO class and relate it into a database table, instantiate an object from your class and tell Hibernate to save that object into the database table. That's great as Hibernate handles almost all JDBC tasks itself. But what if you need to work with database schema.

3. JdbcTemplate vs Hibernate-and-JDBC

It would be necessary in some situations to work with schema directly. For example you need to read data from a table which don't know its structure. JDBC can be a pain and also Hibernate tries to hide database concepts and elements. So Spring introduces JdbcTemplate which uses JDBC internally and provides a more facilitated API. By JdbcTemplate we achieve the power of JDBC but no need for write boiler plate code. The Spring JdbcTemplate has following advantages over standard JDBC:
  • JdbcTemplate has mechanism to clean-up resources automatically i.e. releasing the database connections
  • JdbcTemplate converts Jdbc SQLExceptions into RuntimeExceptions which allows the programmer to react more flexible to the errors
  • JdbcTemplate converts the vendor specific error messages into more understandable and unified set of error messages
  • JdbcTemplate provides methods to write the SQL queries directly
post

Spring Framework

1. What is Spring

Spring is an open-source Framework who simplifies development complexities of java-based enterprise applications. It provides infrastructural support at application level so that developers can focus only on business logic.

2. Framework of frameworks

Also Spring can be thought as a framework for frameworks" because Spring supports and facilitate using a wide range of frameworks such as Hibernate, Struts, etc.

3. Spring Main Approach

Spring at its core, is a dependency injection container which is a pattern for developing decoupled applications. For example if you want to has an object of class ClassA which implements interface MyInterface in class ClassB one option is to new it (ClassA a = new(ClassA);) in class ClassB. This way we would couple class B with implementation of MyInterface and loose the flexibility of managed switching implementation from ClassA into another one. In the other hand Spring manage lifecycle(creation and destroy) of objects (beans) itself, and so developer needs only to work with POJOs and you do not need an EJB container such as an application server. So what happens if somebody, say Spring, can wire these dependencies?

4. Spring Magic

Now it's time to understand how Spring simplifies development process. Spring introduces a descriptive and conventional way in which developer can determine how things must be wired together. For better understanding below is an example for inject dependency using XML while using Spring:
Or using JAVA simply in another way you can annotate a variable of ClassA in ClassB:

5. Spring Features

Spring provides many features such as MVC, Aspec-Oriented-Programming, Batch, Integration, etc. That their explanation is beyond the scope of this article. This article aims to make a short but well understanding of Spring framework essence.